Section 3: S1, S2, R1 and R2? - An Objective Alternative
As already stated, the pivot point zone is a well-known technique and it works simply because many traders and investors use and trust it. However, what about the other support and resistance zones (S1, S2, R1 and R2)? To forecast a support or resistance level with some mathematical formula can be considered as bit arbitrary and subjective. It is hard to rely on them blindly just because the formula popped out that level.
For this reason, we at StraightForex have created an alternative way to map our period, simpler but more objective and effective – and you know we like simple!
We calculate the pivot point as shown before (told you we would be testing and it is not even the quiz yet). However, our support and resistance levels are drawn in a different way.
We take the previous session high and low, and draw those levels on today’s chart. The same is done with the session before the previous session.
The psychology behind this approach is simple. We know that for some reason the market stopped going higher/lower there during the previous session, or the session before that.
We do not know the reason, and really we do not need to know it. We are not doing magic tricks or pulling rabbits out of hats - we only know the fact: the market reversed at that level.
We also know that traders and investors have memories. They do remember that the price stopped there before, and the odds are that the market reverses from there again (maybe for the same reason, and maybe not) or at least find some support or resistance at these levels.
What is important about this approach is that support and resistance levels are measured objectively; they are not just a level derived from a mathematical formula, the price reversed there before so these levels have a higher probability of being effective. We are going on what has been seen and proven before – not what could be. It is quite amazing to watch how the market respects these levels – not because of any magic formula but because strong buying and/or selling occurred at these levels before
Let us define some terms and then we will look at some charts.
PP - Pivot point
LOPS1 - Low of the previous session
HOPS1 - High of the previous session
LOPS2 - Low of the session before the previous session
HOPS2 - High of the session before the previous session

Vertical lines separate the sessions.
When the market opened we see it testing the PP before moving up past HOPS1. At this point we consider the market to be in a strong uptrend so only consider long trades. The market moves back to HOPS1 and a piercing pattern breaks through this level giving a great long signal.
What is important to understand is that the price traded most of the time above the PP, signaling a possible trend, once the market breaks HOPS1 we should only consider long trades.
Here we have a sideways market.

The arrows indicate the market respecting HOPS1 and PP in a ranging market. In this scenario both, long and short trades are available as market has not breached any HOPS levels.
In further lessons, we will show you how to enter and exit the market with high accuracy and low risk using this methodology.
As we can see, our mapping method works on both market conditions, when trending and on sideways conditions. In a trending market, it helps us determine the strength of the trend and trade off important levels, and on sideways markets, it shows us possible reversal levels.
As already stated, the pivot point zone is a well-known technique and it works simply because many traders and investors use and trust it. However, what about the other support and resistance zones (S1, S2, R1 and R2)? To forecast a support or resistance level with some mathematical formula can be considered as bit arbitrary and subjective. It is hard to rely on them blindly just because the formula popped out that level.
For this reason, we at StraightForex have created an alternative way to map our period, simpler but more objective and effective – and you know we like simple!
We calculate the pivot point as shown before (told you we would be testing and it is not even the quiz yet). However, our support and resistance levels are drawn in a different way.
We take the previous session high and low, and draw those levels on today’s chart. The same is done with the session before the previous session.
The psychology behind this approach is simple. We know that for some reason the market stopped going higher/lower there during the previous session, or the session before that.
We do not know the reason, and really we do not need to know it. We are not doing magic tricks or pulling rabbits out of hats - we only know the fact: the market reversed at that level.
We also know that traders and investors have memories. They do remember that the price stopped there before, and the odds are that the market reverses from there again (maybe for the same reason, and maybe not) or at least find some support or resistance at these levels.
What is important about this approach is that support and resistance levels are measured objectively; they are not just a level derived from a mathematical formula, the price reversed there before so these levels have a higher probability of being effective. We are going on what has been seen and proven before – not what could be. It is quite amazing to watch how the market respects these levels – not because of any magic formula but because strong buying and/or selling occurred at these levels before
Let us define some terms and then we will look at some charts.
PP - Pivot point
LOPS1 - Low of the previous session
HOPS1 - High of the previous session
LOPS2 - Low of the session before the previous session
HOPS2 - High of the session before the previous session

[Chart 1]
Vertical lines separate the sessions.
When the market opened we see it testing the PP before moving up past HOPS1. At this point we consider the market to be in a strong uptrend so only consider long trades. The market moves back to HOPS1 and a piercing pattern breaks through this level giving a great long signal.
What is important to understand is that the price traded most of the time above the PP, signaling a possible trend, once the market breaks HOPS1 we should only consider long trades.
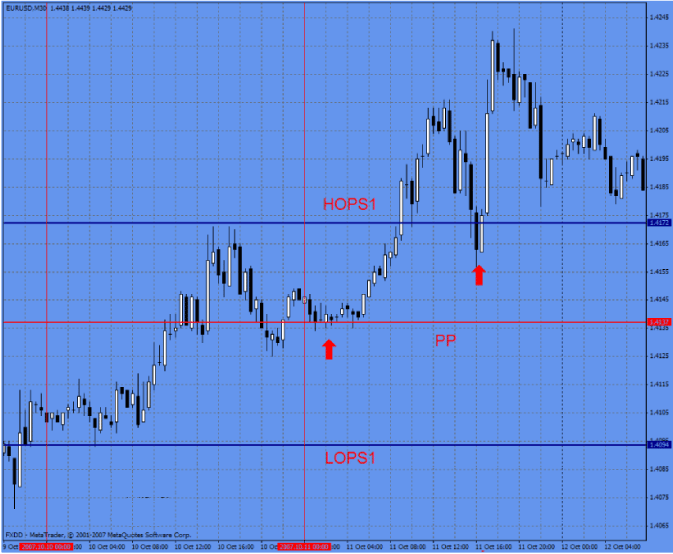
Here we have a sideways market.

[Chart 2]
The arrows indicate the market respecting HOPS1 and PP in a ranging market. In this scenario both, long and short trades are available as market has not breached any HOPS levels.
In further lessons, we will show you how to enter and exit the market with high accuracy and low risk using this methodology.
As we can see, our mapping method works on both market conditions, when trending and on sideways conditions. In a trending market, it helps us determine the strength of the trend and trade off important levels, and on sideways markets, it shows us possible reversal levels.

Post a Comment Blogger Facebook